Bear Oreo Cookies – Easy Yummy Dessert Idea
Bear Oreo Cookies are more than just a treat; they’re a hug in cookie form! If you’re looking for a delightful way to bring a smile to faces, young and old, then these adorable cookies are exactly what you need. We all know and love the classic Oreo, but transforming it into a charming little bear takes it to a whole new level of irresistible. There’s something inherently special about bite-sized cuteness, and Bear Oreo Cookies deliver that in spades. They’re incredibly simple to make, which means more time spent enjoying them and less time stressing in the kitchen. Perfect for parties, school lunches, or just a special afternoon pick-me-up, these Bear Oreo Cookies are guaranteed to be a hit. Get ready to melt hearts, one sweet bear at a time!
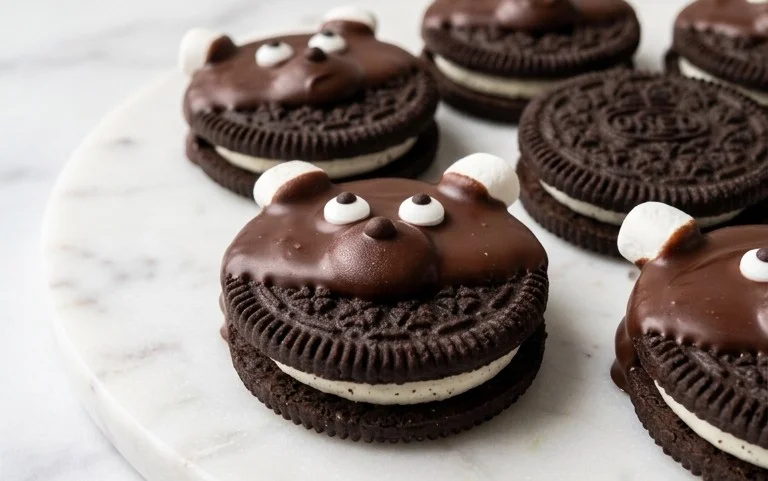
Bear Oreo Cookies
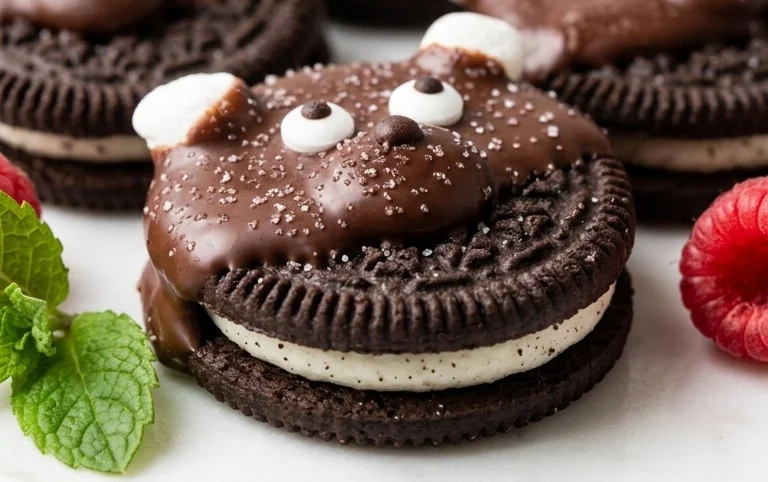
Get ready to unleash your inner baker and create some adorable and utterly delicious Bear Oreo Cookies! These little treats are perfect for parties, holidays, or just a fun afternoon in the kitchen with the kids. They’re surprisingly simple to make and the end result is so charming, they’re almost too cute to eat – almost! We’ll transform classic Oreo cookies into fuzzy little bear faces using a few pantry staples and a dash of creativity.
Ingredients:
Let’s Get Started: The Beary Basics
Before we dive into assembling our adorable bear faces, let’s make sure we have everything prepped and ready. This will make the decorating process smooth and enjoyable. Grab a clean work surface – a baking sheet lined with parchment paper is ideal, as it makes for easy cleanup and prevents your creations from sticking. Have all your ingredients within easy reach. It’s always a good idea to have a damp cloth handy for wiping sticky fingers or any stray frosting.
Crafting Your Bear Faces: Step-by-Step
Now for the fun part – bringing these bears to life!
1. Prepare the Oreo Base: Take your 12 Oreo cookies and carefully twist them apart. You want to separate the two halves, ensuring that the chocolate cookie side is facing up on one half, and the cream filling is intact on the other. For our bear faces, we will be using the side with the cream filling. Gently scrape off any excess cream filling that might have oozed out to create a relatively flat surface. This will give us a better canvas for our frosting. If the cream filling is uneven, you can carefully smooth it out with a small spatula or the back of a spoon.
2. The Fuzzy Ears: This is where those mini vanilla wafer cookies come in. You’ll need to attach these to the top of the Oreo cookie, acting as our bear ears. Take one of the Oreo halves with the cream filling still attached. Dip the edge of a mini vanilla wafer cookie into the chocolate frosting. You want to get a good amount of frosting on the edge, acting as edible glue. Then, gently press the frosted edge of the vanilla wafer cookie onto the top edge of the Oreo cookie, positioning it so it looks like a bear’s ear. Repeat this for all 12 Oreo cookies, ensuring the wafers are securely attached. Let them set for a minute or two so the frosting has a chance to firm up slightly.
3. The Snout and Nose: Now, let’s give our bears their adorable snouts. Take your chocolate frosting and, using a butter knife or a small offset spatula, spread a dollop of frosting onto the lower half of the Oreo cookie, just below the cream filling. This frosted area will be our bear’s snout. For the nose, take your 12 brown M&M’s (or small black jelly beans if you prefer a darker nose) and gently press one into the center of the frosted snout area. Make sure it’s firmly in place. If you’re using jelly beans, a little extra frosting on the jelly bean might help it adhere better.
4. Adding the Eyes: Time to give our bears their expressive eyes! You’ll need your candy eyes and the black edible food coloring marker. For the eyes, gently press two candy eyes onto the chocolate cookie part of the Oreo, above the snout area. Position them so they look like they are looking forward. If the candy eyes don’t seem to be sticking well, a tiny dab of chocolate frosting on the back of the candy eye can help. Once the eyes are in place, take your black edible food coloring marker. Carefully draw a small mouth line below the nose, extending outwards slightly on either side. You can create a simple smile or a more playful expression depending on your preference. This marker is fantastic for fine detail work and really brings your bear faces to life.
5. The Finishing Touches: The Paws! For the final touch, we need to give our bears some little paws. Take your semi-sweet chocolate chips or the remaining brown M&M’s. You’ll use these to create the bear’s front paws. Gently press two chocolate chips or brown M&M’s onto the sides of the frosted snout area, or just below the ears, to represent paws. You can angle them slightly so they look like they are reaching out. A tiny bit of chocolate frosting behind each chip or M&M can ensure they stay put. Once all your bears have their paws, you’re done! Let the frosting set completely before serving or storing.
These Bear Oreo Cookies are a delightful way to add a touch of whimsy to any occasion. They’re incredibly fun to make and even more enjoyable to eat. Enjoy your adorable creations!
Conclusion:
I truly hope you’ve enjoyed exploring the delightful world of Bear Oreo Cookies! These are more than just a treat; they’re a fantastic way to add a playful touch to any occasion. The beauty of this recipe lies in its simplicity and the sheer joy it brings, transforming a classic Oreo into an adorable bear face. They’re perfect for a fun afternoon baking session with kids, a unique addition to a birthday party spread, or simply a way to brighten your own day with something sweet and whimsical. The combination of rich chocolate cookie and creamy filling, presented in such a charming way, makes these a guaranteed hit.
When it comes to serving, think creatively! These Bear Oreo Cookies are wonderful on their own, but they also make excellent decorations for cupcakes or cakes. Imagine a forest-themed birthday cake adorned with these little guys! For variations, don’t be afraid to experiment with different colored candies for the eyes and nose, or even try using different flavored Oreos as your base if you can find them. The possibilities are endless!
So, go ahead and give these Bear Oreo Cookies a try. I’m confident you’ll find them as enjoyable to make as they are to eat. Happy baking!
Frequently Asked Questions about Bear Oreo Cookies:
Q: Can I make these Bear Oreo Cookies ahead of time?
A: Absolutely! These cookies store well in an airtight container at room temperature for up to 3-4 days, making them perfect for preparing in advance for parties or events.
Q: What’s the best way to store the finished cookies?
A: For optimal freshness, store your completed Bear Oreo Cookies in a single layer in an airtight container. Avoid stacking them too high to prevent the ‘bear’ decorations from getting smudged or damaged.
Q: Are there any alternative candies I can use for the bear’s face?
A: Yes, definitely! Beyond classic M&M’s or chocolate chips, you could use small gumdrops, candy buttons, or even tiny pieces of fruit leather for the eyes and nose. Get creative with what you have on hand!
Bear Oreo Cookies
Adorable and easy-to-make bear-shaped cookies using Oreo cookies and vanilla wafers.
Ingredients
-
12 Oreo cookies
-
12 mini vanilla wafer cookies
-
1 (16 oz.) container chocolate frosting
-
12 brown M&M’s
-
24 semi-sweet chocolate chips
-
24 candy eyes
-
Black edible food coloring marker
Instructions
-
Step 1
Gently twist apart 12 Oreo cookies. Scrape out the cream filling from one half of each cookie. These will be the bear faces. -
Step 2
Frost the cream-filled side of the remaining Oreo cookie halves with chocolate frosting. These will be the bear bodies. -
Step 3
For each bear, place a mini vanilla wafer cookie at the top of the frosted Oreo half (the body) to form the ears. Press gently into the frosting. -
Step 4
Using the chocolate frosting as glue, attach two semi-sweet chocolate chips (or brown M&M’s) to the cream-filled Oreo half (the face) to create the muzzle. Then, attach the 12 brown M&M’s (or small black jelly beans) above the muzzle for the nose. -
Step 5
Attach the candy eyes above the muzzle onto the cream-filled Oreo half (the face) using a small amount of chocolate frosting. -
Step 6
Assemble the bears by placing the decorated Oreo face on top of the frosted Oreo body with the vanilla wafer ears. -
Step 7
Use the black edible food coloring marker to draw a mouth on each bear’s muzzle.
Important Information
Nutrition Facts (Per Serving)
It is important to consider this information as approximate and not to use it as definitive health advice.
Allergy Information
Please check ingredients for potential allergens and consult a health professional if in doubt.